1. Dashboard
  2. Forum
    1. Unerledigte Themen
    2. Themen der letzten 24 Stunden
  3. Lexikon
  4. Filebase
    1. Bedienungsanleitungen
    2. Druckvorlagen
    3. Tools
  5. Anschlussdiagramme
    1. Nutzungshinweise
  • Anmelden
  • Registrieren
  • Suche
Lexikon
  • Alles
  • Artikel
  • Seiten
  • Forum
  • Filebase-Eintrag
  • Lexikon
  • Blog-Artikel
  • Erweiterte Suche
  1. Shelly Forum
  2. Lexikon

FIRMWARE FLASH WITH ESP EASY (from Allterco Robotics)

  • SparkyMaster
  • 29. August 2020 um 19:09
  • 29. August 2020 um 20:13
  • 4.627 mal gelesen
  • Instructions for the Shelly Firmware Flash

    Original: https://miralabs.bg/shelly1_flash_en/

    Externer Inhalt miralabs.bg
    Inhalte von externen Seiten werden ohne Ihre Zustimmung nicht automatisch geladen und angezeigt.

    SHELLY1 – WHAT IS IT AND HOW TO FLASH IT WITH ESPEASY?


    NEW!

    FOR THOSE OF YOU WHO DO NOT HAVE TIME OR SUFFICIENT KNOWLEDGE TO FLASH BOARDS, WE HAVE STARTED A NEW PROJECT – FLASHEDFIRMWARE.COM. YOU CAN BUY SMART HOME PRODUCTS(SHELLY1 IS ONE OF THEM) FLASHED WITH YOUR FAVOURITE FIRMWARE!


    Last week Alterco Robotics announced new product from the Shelly family – Shelly 1. The new device is a WiFi connected relay for controlling electrical appliances. The characteristic that impresses the most is the size of the device. The engineers from Alterco Robotics managed to fit the electronics in a nice enclosure with size of 4.1cm x 3.6cm. which allows the module to be installed in a wall switch console. 

    Specifications:

    • ESP8266ex with 2mb of SPI flash
    • 16A relay
    • Power source can be 12V DC, 24v-60v DC and 110-230AC
    • Switch input


    Shelly1 vs Sonoff Basic

    Size41 x 36 x 17 mm88 x 38 x 23 mm
    Max current16A10A
    Power Supply VoltageDC: 12V, 24-60V AC: 110V-230VAC: 90V-250V


    Shelly 1 is aimed at DIY enthusiasts who prefer to flash their own code to the smart devices. The engineers have placed a header with TX, RX, 3v3, GND and GPIO 0 pins thanks to which, we can flash the embedded MCU with our own code.

    In the following lines I will guide you through the process of flashing the ESP8266 MCU with ESPEasy firmware. 

    ESPEasy is a nice firmware for the ESP8266 which allows us to program the MCU without writing a single line of code. It has a good looking web interface where all the configuration is done.


    Required materials:

    • Shelly 1
    • USB to UART convertor
    • Breadboard(recommended)
    • Jumper wires


    Steps for flashing the MCU:

    Step 1: Download ESPEasy firmware

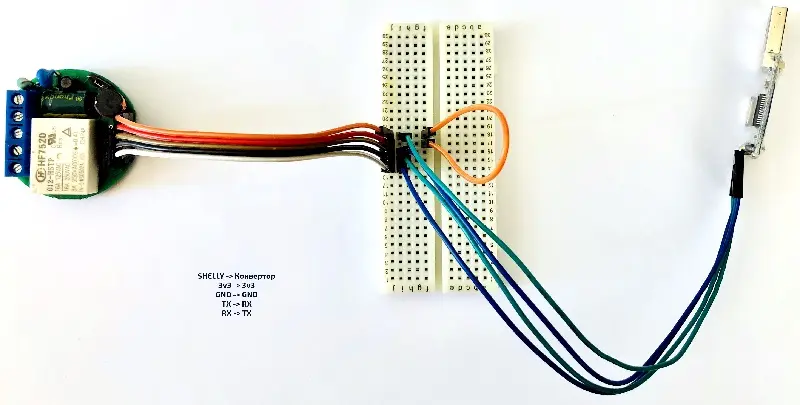
    Step 2: Connect Shelly 1 with the USB to UART convertor following the pinout diagram below.

    60-shelly1-pinout-400x400-png

    • In order to boot the ESP in flash mode GPIO 0 must be connected to GND when powering on the device.
    • In this case I am using a breadboard and the orange jumper is connecting GPIO 0 and GND.
    • After powering on the device we can remove the jumper between GPIO 0 and GND.


    Step 3: Check on which COM port is the USB to UART convertor.


    Externer Inhalt miralabs.bg
    Inhalte von externen Seiten werden ohne Ihre Zustimmung nicht automatisch geladen und angezeigt.
    • In this case its COM 6.


    Step 4: Open ESPEasy Flasher from the ZIP archive that we just downloaded.


    Externer Inhalt miralabs.bg
    Inhalte von externen Seiten werden ohne Ihre Zustimmung nicht automatisch geladen und angezeigt.
    • Choose the COM port on which the convertor is connected and select the normal_ESP8266_1024.bin file from the Firmware drop-down menu.
    • Since the ESP in Shelly 1 has 2mb of flash we choose the firmware for 1mb flash.
    • Press the flash button and wait for the firmware to upload.

    Externer Inhalt miralabs.bg
    Inhalte von externen Seiten werden ohne Ihre Zustimmung nicht automatisch geladen und angezeigt.


    Step 5: Setup Wifi

    • After we have successfully flashed the ESP, it will make a WiFi hotspot with SSID ESP_Easy_0 and password configesp. The web interface is accessible on 192.168.4.1. More information here.


    Step 6: Connect with Domoticz

    • From the web interface go to Controllers section to add a new controller. From the drop-down menu select Domoticz MQTT.
    • We fill in only the following fields:
    1. In Controller IP we fill in the IP address of the MQTT broker.
    2. In Controller port we fill in 1883
    3. In Controller User and Controller Password we fill in the credentials for the MQTT broker ONLY IF WE HAVE CREATED ONE! If not leave blank.
    4. Put a tick on Enabled and click submit.

    Externer Inhalt miralabs.bg
    Inhalte von externen Seiten werden ohne Ihre Zustimmung nicht automatisch geladen und angezeigt.


    Step 7: Setting up devices

    • The only thing left is to add the Shelly’s relay and switch input as devices in the Devices section.
    • In Devices section we add all sensors and actuators that are connected to the ESP. In our case we have to add two records – one for the relay on GPIO 4 and one for the switch input on GPIO 5.
    • For the relay we choose device type “Output – Domoticz MQTT Helper” and for the switch “Switch Input – Switch”.
    • Fill in the fields as shown below and for IDX fill in the IDX of the virtual devices that you have created in Domoticz.
    • Click on Enabled on both devices and also click on Send to Controller on the Switch settings.

    Externer Inhalt miralabs.bg
    Inhalte von externen Seiten werden ohne Ihre Zustimmung nicht automatisch geladen und angezeigt.


    Externer Inhalt miralabs.bg
    Inhalte von externen Seiten werden ohne Ihre Zustimmung nicht automatisch geladen und angezeigt.


    We are ready! :thumbup:

    • Zitieren

Teilen

  • Vorheriger Eintrag Firmware Backup/Recovery (Original-FW)
  • Nächster Eintrag FIRMWARE FLASHEN MIT ESPEASY FLASHER (WINDOWS)
  • PDF

Kategorien

  1. SHELLY GEN1 205
    1. Shelly 1 81
    2. Shelly 1L 55
    3. Shelly 1PM 82
    4. Shelly 2 83
    5. Shelly 2 LED 55
    6. Shelly 2.5 88
    7. Shelly 3EM 65
    8. Shelly 4Pro 66
    9. Shelly Air 14
    10. Shelly Button 1 59
    11. Shelly Bulb 59
    12. Shelly Dimmer 66
    13. Shelly Dimmer2 61
    14. Shelly Door/Window 62
    15. Shelly Door/Window2 59
    16. Shelly Duo GU10 57
    17. Shelly Duo 57
    18. Shelly DUO RGBW 55
    19. Shelly DUO RGBW GU10 55
    20. Shelly EM 68
    21. Shelly Flood 60
    22. Shelly GAS 56
    23. Shelly H&T 67
    24. Shelly i3 58
    25. Shelly Motion 56
    26. Shelly Motion 2 6
    27. Shelly Plug 63
    28. Shelly Plug S 68
    29. Shelly Plug US 8
    30. Shelly RGBW2 75
    31. Shelly Sense 49
    32. Shelly Smoke 59
    33. Shelly TRV 17
    34. Shelly UNI 61
    35. Shelly UV-C-LED-Strip 46
    36. Shelly Vintage 57
  2. SHELLY GEN2 47
    1. Shelly PLUS 0-10V Dimmer 13
    2. Shelly PLUS 1 27
    3. Shelly PLUS 1 Mini 16
    4. Shelly PLUS 1PM 25
    5. Shelly PLUS 1PM Mini 15
    6. Shelly PLUS 2PM 20
    7. Shelly PLUS i4 / i4 DC 19
    8. Shelly PLUS H&T 12
    9. Shelly PLUS Plug S 11
    10. Shelly PLUS PM Mini 14
    11. Shelly PLUS RGBW PM 6
    12. Shelly PLUS Smoke 10
    13. Shelly PLUS UNI 8
  3. SHELLY GEN3 28
    1. Shelly 1 Gen3 9
    2. Shelly 1 Mini Gen3 9
    3. Shelly 1L/2L Gen3 6
    4. Shelly 1PM Gen3 9
    5. Shelly 1PM Mini Gen3 9
    6. Shelly 2PM Gen3 9
    7. Shelly 3EM-63T / 3EM-63W Gen3 6
    8. Shelly DALI Dimmer Gen3 7
    9. Shelly Dimmer Gen3 5
    10. Shelly Dimmer 0/1-10V PM Gen3 7
    11. Shelly EM Gen3 7
    12. Shelly H&T Gen3 5
    13. Shelly i4 Gen3 7
    14. Shelly Outdoor Plug S Gen3 4
    15. Shelly Plug S Gen3 6
    16. Shelly PM Mini Gen3 7
  4. SHELLY GEN4 13
    1. Shelly 1 Gen4 6
    2. Shelly 1 Mini Gen4 6
    3. Shelly 1PM Gen4 6
    4. Shelly 1PM Mini Gen4 6
    5. Shelly 2PM Gen4 6
    6. Shelly EM Mini Gen4 5
    7. Shelly Flood Gen4 3
  5. SHELLY PRO 91
    1. Shelly PRO 1 25
    2. Shelly PRO 1PM 25
    3. Shelly PRO 2 25
    4. Shelly PRO 2PM 25
    5. Shelly PRO 3 21
    6. Shelly PRO 3EM 18
    7. Shelly PRO EM-50 14
    8. Shelly Pro 3EM-3CT63 10
    9. Shelly Pro 3EM-400 17
    10. Shelly PRO 4PM 63
    11. Shelly Pro Dimmer 0/1-10V PM 9
    12. Shelly Pro Dimmer 1PM / 2PM 11
    13. Shelly Pro Dual Cover/Shutter PM 13
    14. Shelly Pro RGBWW PM 7
  6. SHELLY BLU 22
    1. Shelly BLU Button1 3
    2. Shelly BLU Button Tough 1 3
    3. Shelly BLU Door Window 5
    4. Shelly BLU Gateway 1
    5. Shelly BLU Gateway Gen3 3
    6. Shelly BLU H&T 4
    7. Shelly BLU Motion 5
    8. Shelly BLU RC Button 4 3
    9. Shelly BLU TRV 9
    10. Shelly BLU Wall Switch 4 3
  7. Shelly CONTROL PANELS 8
    1. Shelly Wall Display 7
    2. Shelly Wall Display X2 3
  8. Shelly QUBINO WAVE 22
    1. Shelly Wave 1 3
    2. Shelly Wave 1 Mini 2
    3. Shelly Wave 1PM 3
    4. Shelly Wave 1PM Mini 2
    5. Shelly Wave 2PM 2
    6. Shelly Wave Door/Window 2
    7. Shelly Wave i4 / i4 DC 3
    8. Shelly Wave Plug S 2
    9. Shelly Wave PM Mini 2
    10. Shelly Wave Shutter 2
    11. Shelly Wave Pro 1 3
    12. Shelly Wave Pro 1PM 3
    13. Shelly Wave Pro 2 3
    14. Shelly Wave Pro 2PM 3
    15. Shelly Wave Pro 3 3
    16. Shelly Wave Pro Dimmer 1PM / 2PM 4
    17. Shelly Wave Pro Shutter 3
  9. Shelly X 3
    1. Shelly-X-MOD1(U)-H8 0
    2. Shelly X MOD1 – DevKit DB2024R-XSM 0
    3. Shelly X MOD1 – DevKit DB2024T-XSM 0
    4. POWERED BY SHELLY Geräte 4
      1. FrankEver Smart water valve DN20 1
      2. LinkedGo Smart floor heating thermostat 1
      3. LinkedGo Smart HVAC thermostat 1
      4. Ogemray Smart relay 25A 1
  10. SHELLY ZUBEHÖR 65
    1. Shelly 1/1PM Temp Add-On 48
    2. Shelly Button 38
    3. Shelly PLUS Add-On 6
    4. Shelly LoRa Add-On 2
    5. Shelly LAN Switch 0
    6. Shelly GAS Add-On Manipulator 22
    7. Shelly PRO 3EM Switch Add-On 3
    8. Shelly Wall Switch 1
    9. Shelly Eye 19
  11. LOQED 2
    1. LOQED Touch smart lock Black 2
  12. APP, WEBUI, REST-API, MQTT & CO. 48
    1. SHELLY Cloud App Android/IOS 25
    2. MQTT 8
    3. Rest Api 13
    4. CoAP/ColoT 7
  13. SPRACHASSISTENTEN 2
    1. Alexa 1
    2. Google 1
    3. Siri 0
  14. ALTERNATIVE FIRMWARE 1
    1. Tasmota 1
  15. SONSTIGES 30
    1. Einbau 10
    2. Betrieb in Deutschland 3
    3. Bestellung Lieferung 3
    4. Video Tutorials 3

INFORMATIONEN

  1. Datenschutzerklärung
  2. Cookie-Richtlinie
  3. Nutzungsbedingungen
  4. Impressum

COMMUNITY

  1. Forum
  2. Lexikon
  3. Filebase
  4. Netiquette
Lexikon, entwickelt von www.viecode.com
Community-Software: WoltLab Suite™