1. Dashboard
  2. Forum
    1. Unerledigte Themen
  3. Lexikon
  4. Anschlussdiagramme
    1. Nutzungshinweise
  • Anmelden
  • Registrieren
  • Suche
Lexikon
  • Alles
  • Artikel
  • Seiten
  • Forum
  • Lexikon
  • Erweiterte Suche
  1. Shelly Forum
  2. Lexikon

Issues Integration in the App Shelly Cloud

  • SparkyMaster
  • 6. Oktober 2019 um 17:47
  • 7. September 2021 um 11:56
  • 14.479 mal gelesen

VPN/Proxy erkannt

Es scheint, dass Sie einen VPN- oder Proxy-Dienst verwenden. Bitte beachten Sie, dass die Nutzung eines solchen Dienstes die Funktionalität dieser Webseite einschränken kann.

  • Issues Integration in the App Shelly Cloud

    Since integrating the Shellys in the app Shelly Cloud but increasingly leads to problems, I would like to provide a guide that promises to 100% success (at least it is with me ;)).

    To make the integration as easy as possible do not incorporate the Shelly into an existing electrical installation!

    A 2-pin power cable with Euro-plug is the better choice!

    Note: Work on electrical systems or equipment is life-threatening and must only be carried out by qualified electricians.


    Requirement:

    • App: Shelly Cloud from App Store (iOS) or Google Play (Android)

    • Creation of a new account with successful login
    • PC with WLAN and existing internet connection
    • PC-WLAN-Network settings: IP and DNS receive automatically
    • Wi-Fi security: Set to "Allow all new Wi-Fi devices" (Router setting)


    1. Make power supply to the Shellys

    • connection 230 VAC -> L = Phase, N = Neutral
    • or:
    • connection 12 VDC / 24-60 VDC -> L (-) and N (+)
    • Shelly 1: jumper correctly?

    2. Wireless connection

    • open "available networks" on the pc
    • Shelly-SSID -> connect
    • WIFI MODE - ACCESS POINT (AP)
      Shelly will create its own WiFi Access Point. SSID = Name of the Device and Shelly-ID

    • browser address bar: Default-Shelly IP 192.168.33.1 -> ENTER


    3. WebUI

    • WIFI MODE - ACCESS POINT (AP)


    • for the first-installation do not settings, except "Internet & Security":


    • WIFI MODE - CLIENT (CM):
    • Allows Shelly to connect to an available Wi-Fi network (home network).
    • For a stable connection fixed (static) IP assigned, outside the DHCP range.
    • -> CONNECT

    WIFI MODE - CLIENT (CM)

    • browser address bar: new IP 192.168.xxx.xxx -> ENTER
    • If you have a successful connection, you are now on the Shelly in the home network.
    • If a new FW update is available, please do it first!
    • Settings can now be made or adjusted individually according to individual needs and projects.

    The Shelly is now ready to work and can be integrated into the electrical installation.

    Again the Note: ;)

    Work on electrical systems or equipment is life-threatening and must only be carried out by qualified electricians.

    For operation with a mobile device -> mobile phone or pad, continue here:

    4. App "Shelly Cloud"

    • open App and login
    • The app automatically detects newly embedded Shelly devices -> DISCOVERED DEVICES

    • push on DISCOVERED DEVICES!
    • in the next Window: create Device-name, Choose Room for Device, Choose Device Picture -> SAVE DEVICE

    • The Shelly can be selected after selection of the room in the app and operated directly. Individual adjustments are now also possible here.


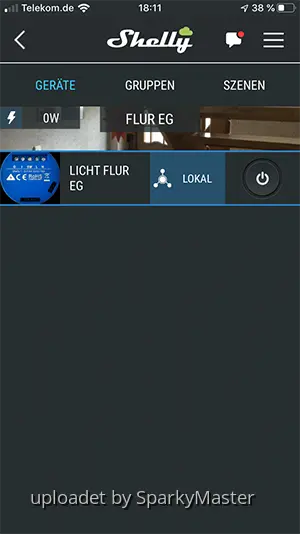
    The Shelly is now successfully included in the app "Shelly Cloud" and can be operated and controlled remotely with the mobile phone or a pad while the cloud is activated.


    5. Personalize

    Upload pictures:

    • individual pictures can be uploaded -> UPLOAD PICTURES
    • Images are administrated in the Images-manager -> Menu bar/User Setting/Images/Select Images


    Edit the Device:

    • If you want to edit a Shelly device once, change the device name, assign it to a different room, change / adjust pictures, ... if necessary also delete it, this is done via the App menu -> the 3 dashes in the upper right corner.


    I hope with this guide to make the integration easier!

    Now much success in integrating your Shellys! :thumbup::)


    Trouble shooting:

    Should something go wrong, these points may help:

    - clear Cache

    - Restart the App, eventually delete and reinstall the App

    - Issues integration in the WLAN-Network (-> in the making!:saint:

    - Factory Reset: Return Shelly to its factory default settings

    1. disconnect the Shelly from Power
    2. Restore power supply
    3. Within the first minute, toggle a switch connected to the "SW" input on the Shelly 5 times on/off (10 total) or press and release momentary button 5 times. You have to hear the relay trigger itself.
    4. After the trigger sound, shelly should return to AP-Mode.

Teilen

  • Vorheriger Eintrag Installation langer LED-Streifen
  • Nächster Eintrag Issues Integration in the WLAN-Network
  • PDF

Kategorien

  1. SHELLY GEN1 207
    1. Shelly 1 81
    2. Shelly 1L 56
    3. Shelly 1PM 82
    4. Shelly 2 83
    5. Shelly 2 LED 55
    6. Shelly 2.5 88
    7. Shelly 3EM 66
    8. Shelly 4Pro 66
    9. Shelly Air 15
    10. Shelly Button 1 60
    11. Shelly Bulb 59
    12. Shelly Dimmer 66
    13. Shelly Dimmer2 62
    14. Shelly Door/Window 62
    15. Shelly Door/Window2 59
    16. Shelly Duo GU10 57
    17. Shelly Duo 57
    18. Shelly DUO RGBW 55
    19. Shelly DUO RGBW GU10 55
    20. Shelly EM 69
    21. Shelly Flood 60
    22. Shelly GAS 56
    23. Shelly H&T 67
    24. Shelly i3 58
    25. Shelly Motion 56
    26. Shelly Motion 2 8
    27. Shelly Plug 63
    28. Shelly Plug S 68
    29. Shelly Plug US 9
    30. Shelly RGBW2 76
    31. Shelly Sense 49
    32. Shelly Smoke 59
    33. Shelly TRV 20
    34. Shelly UNI 61
    35. Shelly UV-C-LED-Strip 46
    36. Shelly Vintage 57
  2. SHELLY GEN2 53
    1. Shelly PLUS 0-10V Dimmer 16
    2. Shelly PLUS 1 30
    3. Shelly PLUS 1 Mini 20
    4. Shelly PLUS 1PM 29
    5. Shelly PLUS 1PM Mini 19
    6. Shelly PLUS 2PM 24
    7. Shelly PLUS i4 / i4 DC 22
    8. Shelly PLUS H&T 15
    9. Shelly PLUS Plug S 13
    10. Shelly PLUS PM Mini 17
    11. Shelly PLUS RGBW PM 11
    12. Shelly PLUS Smoke 12
    13. Shelly PLUS UNI 12
  3. SHELLY GEN3 40
    1. Shelly 1 Gen3 14
    2. Shelly 1 Mini Gen3 15
    3. Shelly 1L/2L Gen3 14
    4. Shelly 1PM Gen3 14
    5. Shelly 1PM Mini Gen3 14
    6. Shelly 2PM Gen3 14
    7. Shelly 3EM-63T / 3EM-63W Gen3 10
    8. Shelly DALI Dimmer Gen3 10
    9. Shelly Dimmer Gen3 13
    10. Shelly Dimmer 0/1-10V PM Gen3 11
    11. Shelly EM Gen3 10
    12. Shelly H&T Gen3 10
    13. Shelly i4 Gen3 10
    14. Shelly Outdoor Plug S Gen3 10
    15. Shelly Plug S Gen3 10
    16. Shelly PM Mini Gen3 10
    17. Shelly Shutter 9
  4. SHELLY GEN4 24
    1. Shelly 1 Gen4 13
    2. Shelly 1 Mini Gen4 14
    3. Shelly 1PM Gen4 13
    4. Shelly 1PM Mini Gen4 13
    5. Shelly 2PM Gen4 12
    6. Shelly EM Mini Gen4 9
    7. Shelly Flood Gen4 11
    8. Shelly Power Strip 4 Gen4 5
  5. SHELLY PRO 94
    1. Shelly PRO 1 29
    2. Shelly PRO 1PM 29
    3. Shelly PRO 2 29
    4. Shelly PRO 2PM 29
    5. Shelly PRO 3 25
    6. Shelly PRO 3EM 21
    7. Shelly PRO EM-50 17
    8. Shelly Pro 3EM-3CT63 13
    9. Shelly Pro 3EM-400 19
    10. Shelly PRO 4PM 65
    11. Shelly Pro Dimmer 0/1-10V PM 12
    12. Shelly Pro Dimmer 1PM / 2PM 15
    13. Shelly Pro Dual Cover/Shutter PM 17
    14. Shelly Pro RGBWW PM 12
  6. SHELLY BLU 28
    1. Shelly BLU Button1 4
    2. Shelly BLU Button Tough 1 4
    3. Shelly BLU Distance 1
    4. Shelly BLU Door Window 6
    5. Shelly BLU Gateway 3
    6. Shelly BLU Gateway Gen3 5
    7. Shelly BLU H&T 6
    8. Shelly BLU Motion 6
    9. Shelly BLU Remote Control ZB 4
    10. Shelly BLU RC Button 4 4
    11. Shelly BLU TRV 12
    12. Shelly BLU Wall Switch 4 4
  7. Shelly CONTROL PANELS 17
    1. Shelly Wall Display 14
    2. Shelly Wall Display X2 8
    3. Shelly Wall Display XL 5
  8. Shelly QUBINO WAVE 25
    1. Shelly Wave 1 3
    2. Shelly Wave 1 Mini 2
    3. Shelly Wave 1PM 3
    4. Shelly Wave 1PM Mini 2
    5. Shelly Wave 2PM 2
    6. Shelly Wave Dimmer 2
    7. Shelly Wave Door/Window 2
    8. Shelly Shelly H&T 2
    9. Shelly Wave i4 / i4 DC 3
    10. Shelly Wave Motion 2
    11. Shelly Wave Plug S 2
    12. Shelly Wave PM Mini 2
    13. Shelly Wave Shutter 2
    14. Shelly Wave Pro 1 3
    15. Shelly Wave Pro 1PM 3
    16. Shelly Wave Pro 2 3
    17. Shelly Wave Pro 2PM 3
    18. Shelly Wave Pro 3 3
    19. Shelly Wave Pro Dimmer 1PM / 2PM 4
    20. Shelly Wave Pro Shutter 3
  9. Shelly X 4
    1. Shelly-X-MOD1(U)-H8 0
    2. Shelly X MOD1 – DevKit DB2024R-XSM 0
    3. Shelly X MOD1 – DevKit DB2024T-XSM 0
    4. POWERED BY SHELLY Geräte 10
      1. Ecowitt WS90 - 7-in-1 weather station 2
      2. FrankEver Smart water valve DN20 2
      3. FrankEver Sprinkler Controller FK-06X 2
      4. LinkedGo Smart floor heating thermostat 2
      5. LinkedGo Smart HVAC thermostat 2
      6. Ogemray Smart relay 25A 4
      7. TopAC Portable EV charger 11kW EVE01-11R 2
  10. SHELLY ZUBEHÖR 65
    1. Shelly 1-Channel / 4-Channel Decoupler 230V 1
    2. Shelly 1/1PM Temp Add-On 46
    3. Shelly Button 38
    4. Shelly PLUS Add-On 8
    5. Shelly LoRa Add-On 2
    6. Shelly LAN Switch 0
    7. Shelly GAS Add-On Manipulator 21
    8. Shelly PRO 3EM Switch Add-On 4
    9. Shelly Wall Switch 2
    10. Shelly Eye 18
  11. LOQED 2
    1. LOQED Touch Smart Lock 2
  12. APP, WEBUI, REST-API, MQTT & CO. 48
    1. SHELLY Cloud App Android/IOS 25
    2. MQTT 8
    3. Rest Api 13
    4. CoAP/ColoT 7
  13. SPRACHASSISTENTEN 2
    1. Alexa 1
    2. Google 1
    3. Siri 0
  14. ALTERNATIVE FIRMWARE 1
    1. Tasmota 1
  15. SONSTIGES 32
    1. Einbau 12
    2. Betrieb in Deutschland 3
    3. Bestellung Lieferung 3
    4. Video Tutorials 4

INFORMATIONEN

  1. Datenschutzerklärung
  2. Cookie-Richtlinie
  3. Nutzungsbedingungen
  4. Impressum

COMMUNITY

  1. Forum
  2. Lexikon
  3. Netiquette
  4. Status
Lexikon, entwickelt von www.viecode.com
Community-Software: WoltLab Suite™